
Maintaining your lift cables is vital because they are a major part of the lifting process. They ensure that the vehicle is level during the raising or lowering of your lift. Over time these cables will stretch and need to be checked to ensure that they are being used properly. Your cables will stretch with use and will cause the carriages in each post to lift uneven. An easy way to determine if your cables need to be adjusted is to listen to your locks on each post. If your locks are clicking in to position at different times, then you know it is time to adjust each cable. The cables need to be adjusted so that each carriage travels equally throughout the lifting and lowering process. Below are the process for installing and adjusting the cables on our 2-post and 4 post car lifts.
Installing the Cables – 2-Post Lift
1] Manually raise both carriages to rest on the second set of locks from the floor (Fig. 9).
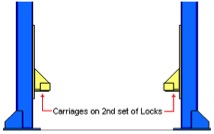
(Fig. 9)
2] Make sure both carriages are resting on the second set of locks. Carriages must be equal height from floor.
3] Unwrap both cables. Install 2 nuts on one end of each cable. About an inch (1”) of thread should show through the nuts. Lock these two nuts tightly against each other. This end will be inside and at the rear of the carriage after routing.
4] With both carriages in place on the second set of locks, route cables as shown (Fig. 10).
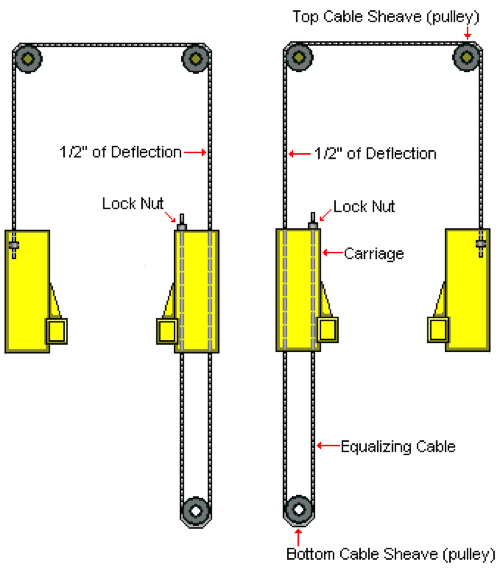
(Fig. 10)
5] All adjustments should be made at the exposed cable end pointing upward at the front of each carriage. It may be necessary to secure the cable end with a pair of vice grips inside the carriage.
6] Remove the slack from both cables. Before all slack is removed, begin to alternate from one post to the other. First tighten one cable a few turns, before returning to the other post and tightening the second cable an equal number of turns. If done correctly, both cables will tighten up an equal amount, and neither carriage will lift off the locks as they are tightening against one another.
7] Continue to tighten the cables until there is ½” of deflection in the cable about 3 feet above the carriage at the back of each column (Fig 10).
8] Install a second nut on each of the cable ends and lock them tightly against the first nut.
NOTE: Cable tension is very important to the correct and safe operation of your lift.
See the Maintenance Section of this manual for information on maintaining proper cable tensions.
Cable Installation 4-Post Storage/Service Lift
IMPORTANT: Do not damage the chrome cylinder rod during this process. This can ruin the seals of the cylinder resulting in fluid leakage.
1. Inspect cables to ensure proper lengths. All cables should have ID tags showing proper cable lengths.
2. Make sure the cylinder flange plate is installed with pipe receivers facing TOWARDS the cylinder.
3. In order to install cables it is necessary to first extend the hydraulic cylinder. The easiest way to do this is to lay on a creeper under the track and put your feet on the cable plate and push the cylinder rod out to the desired position. You may also use a come-a-long to pull the rod out as an alternative method.
4. Rout cables according to illustration. (fig. 7)
5. Install flat-washer and nyloc nut on end of cable at top of post. Tighten until several threads show past the nut.
6. Cables should run around the inside of the small rollers (side of the roller furthest from the posts