Shopping Cart

Your cart is currently empty.

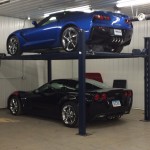
2014 Limited Edition Stingray on Eagle Storage Lift

Eagle scores another touchdown! Another satisfied customer! It is that time of year to put away your prized possessions for the winter. We at Eagle are very happy to oblige your request with one of our storage lifts  (MS-8000 storage lift and MS-8000XLT storage lift). We love to hear back from our customers when their expectation have been meet or exceeded such as the case with Gary in Milan, Illinois. Thank you Gary for taking the time to send us a picture of your lift in action, with your prized 2014 Limited Edition Stingray.

GLO-8000XLT blogGLO-8000XLT 2

“The second photo shows the 2014 Limited Edition Stingray this is one of 161, there were supposed to be 500. I am very satisfied with your product; my installers had no problems even though they had never worked on an Eagle before and it work great.“

Customer satisfaction is our priority and we love to hear back from our loyal customers.

What the heck is Compliance & Where Do I Get a Certified Lift?

Opening a new business can be exciting, exhilarating and downright stressful. Opening an auto repair shop needs to be approached with the same care as opening any other type of business. As a business owner, there are many factors you must consider. Healthcare, Insurance, OSHA, processing solutions, employees and the list goes on! You must dot your i’s and cross your t’s.  Whether you are opening a shop for basic mechanical work (changing oil, spark plugs, filters, etc.) or you will be performing larger mechanical repairs (engine replacements, transmissions, etc.) you must look into requirements for special licenses and requirements under your city’s guidelines.

Aside from the basics, like registering your business at the federal level and applying for local business license, you need to check the property’s zoning ordinance before signing a lease or purchasing a property for auto repair shop.  You must review your city’s specific guidelines for safety as well as OSHA standards before designing your floor plan and establish a plan for your handling and disposing of hazardous waste along with special permits and licenses for waste disposal.

Consider the following:

Is the electrical in compliance?

Is you garage floor adequate? You may need to have your concrete tested if you do not have the specifications from the owner or landlord. Knowing the strength and thickness of your concrete will help you determine the lift you can install.

Are you required to install a certified lift? What is a certified lift? I’m glad you asked because this has come up in past experience where a customer has purchased a lift but was not aware that the city inspectors were requiring a certified lift. Unfortunately, we at Eagle cannot tell you if you need a certified lift — only your local city or local code enforcement agency can.

etl-logoWhat does it mean to be certified?

Certification is a system whereby an independent, third-party, organization determines that a manufacturer has the ability to produce a product that complies with a specific set of standards. The Automotive Lift Institute (ALI) sponsors a certified program for automotive lifts. Certified products undergo a periodic re-evaluation and are required to be produced within the requirement of a documented quality program.   Intertek Testing Services (ETL) is contracted by ALI to administer the certification program.  ETL is a global product testing, inspection and certification organization. ALI has obtained accreditation for this program from the American National Standard Institute. This assures unquestionable integrity for the program.  A certified lift must bear a third-party certification label (ALI/ETL) or it is not certified.

LECL-10A-2-CMYK

Can my previously purchased lift be certified?  No. After installation the structural design elements such as material composition and required stress calculations cannot be validated.

Why are some required to have a certified lift while others are not? The United States currently uses a voluntary standards system where compliance with applicable standards is compulsory when mandated by regulation or requirements imposed by the authority having jurisdiction. When in doubt contact your city clerk and your state/federal OSHA.

If you are considering buying an existing shop, do not assume that the previous owners have followed the due process. Do your homework, in the long run it will pay off and you will have a safe and successful business.

We have an ETL Certified 10,000 lb two-post lift available through Eagle Equipment.

Save

Important Lift Maintainance: Lift Cables

Maintaining your lift cables is vital because they are a major part of the lifting process. They ensure that the vehicle is level during the raising or lowering of your lift. Over time these cables will stretch and need to be checked to ensure that they are being used properly. Your cables will stretch with use and will cause the carriages in each post to lift uneven. An easy way to determine if your cables need to be adjusted is to listen to your locks on each post. If your locks are clicking in to position at different times, then you know it is time to adjust each cable. The cables need to be adjusted so that each carriage travels equally throughout the lifting and lowering process. Below are the process for installing and adjusting the cables on our 2-post and 4 post car lifts.

Installing the Cables – 2-Post Lift

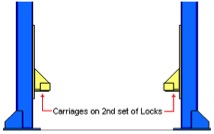
1] Manually raise both carriages to rest on the second set of locks from the floor (Fig. 9).
Installing 2 post car lift cables

(Fig. 9)

2] Make sure both carriages are resting on the second set of locks. Carriages must be equal height from floor.

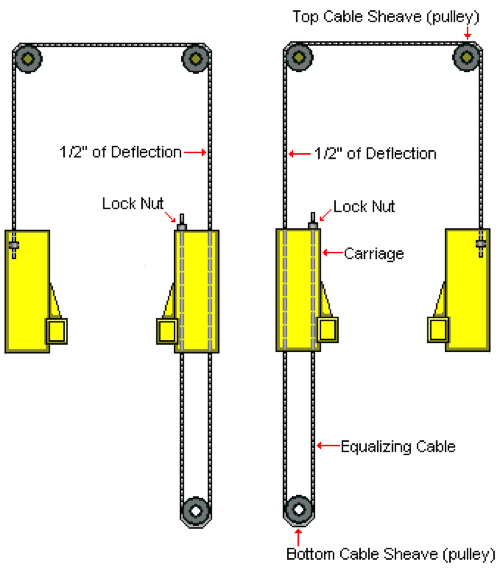
3] Unwrap both cables.  Install 2 nuts on one end of each cable. About an inch (1”) of thread should show through the nuts. Lock these two nuts tightly against each other.  This end will be inside and at the rear of the carriage after routing.

4] With both carriages in place on the second set of locks, route cables as shown (Fig. 10).
 Installing 2 post car lift cables diagram

(Fig. 10)

5] All adjustments should be made at the exposed cable end pointing upward at the front of each carriage. It may be necessary to secure the cable end with a pair of vice grips inside the carriage.

6] Remove the slack from both cables. Before all slack is removed, begin to alternate from one post to the other. First tighten one cable a few turns, before returning to the other post and tightening the second cable an equal number of turns. If done correctly, both cables will tighten up an equal amount, and neither carriage will lift off the locks as they are tightening against one another.

7] Continue to tighten the cables until there is ½” of deflection in the cable about 3 feet above the carriage at the back of each column (Fig 10).

8] Install a second nut on each of the cable ends and lock them tightly against the first nut.

NOTE: Cable tension is very important to the correct and safe operation of your lift.

See the Maintenance Section of this manual for information on maintaining proper cable tensions.

Cable Installation 4-Post Storage/Service Lift

IMPORTANT: Do not damage the chrome cylinder rod during this process. This can ruin the seals of the cylinder resulting in fluid leakage.

1. Inspect cables to ensure proper lengths. All cables should have ID tags showing proper cable lengths.

2. Make sure the cylinder flange plate is installed with pipe receivers facing TOWARDS the cylinder.

3. In order to install cables it is necessary to first extend the hydraulic cylinder. The easiest way to do this is to lay on a creeper under the track and put your feet on the cable plate and push the cylinder rod out to the desired position.  You may also use a come-a-long to pull the rod out as an alternative method.

4. Rout cables according to illustration. (fig. 7)

5. Install flat-washer and nyloc nut on end of cable at top of post. Tighten until several threads show past the nut.

6. Cables should run around the inside of the small rollers (side of the roller furthest from the posts

 

Sign up to our newsletter & Receive Savings In Your Inbox

Sign Up

Copyright © 2024 Eagle Equipment. | Ecommerce Shopping Cart Software by Miva, Inc.